|
Amazon Orders to TrepStar using Zapier Integration: |
Overview:
- If you are an Amazon seller, and are selling a TrepStar CD/DVD/USB product, you can use your Zapier account to automatically submit your Amazon orders to TrepStar for order fulfillment.
- To use this integration, you will need to be an Amazon seller (sellercentral.amazon.com) and have a Zapier.com account.
 Watch the Amazon Zapier Integration Video: 10 Minutes.
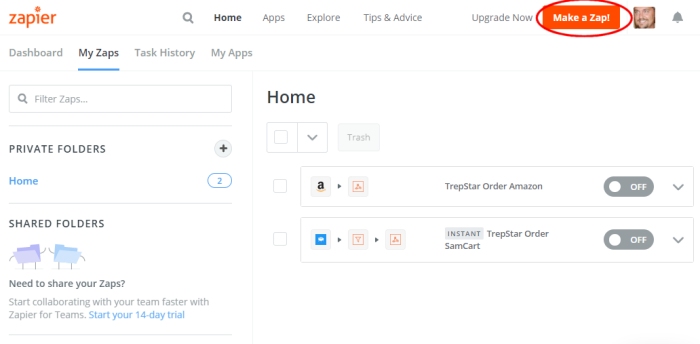
Start by creating a new Zap:
- Login to Zapier.com
- Click 'Make a Zap!'
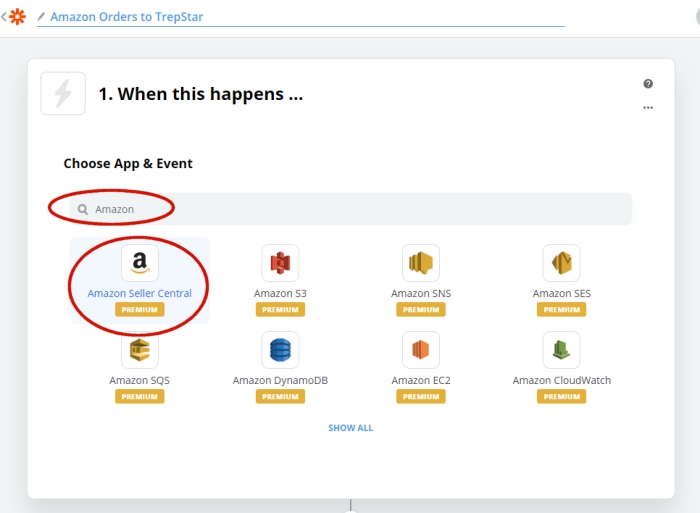
Choose Amazon Seller Central:
- Search for Amazon and find 'Amazon Seller Central' in the list.
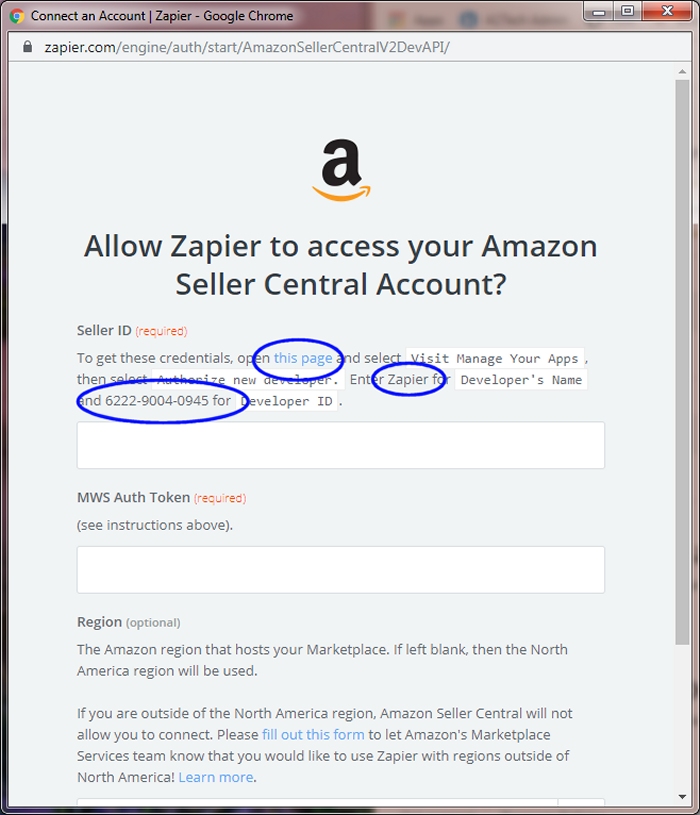
Connect Zapier to your Amazon Seller Central Account:
- Connect to your Amazon Account.
- Click the 'this page' link.
- Login to your amazon seller central account.
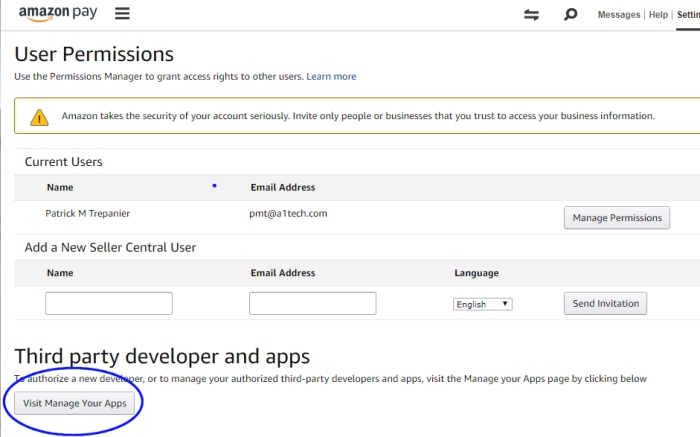
Manage Your Apps:
- Find this screen and click the 'Visit Manage Your Apps' button.
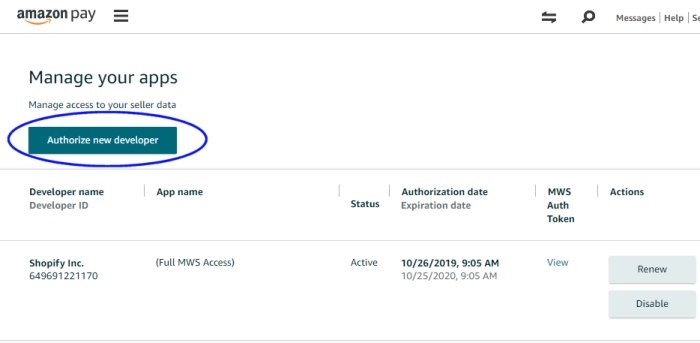
Authorize New Developer:
- Click the Authorize new developer button to give Zapier the ability to communicate with your Amazon account.
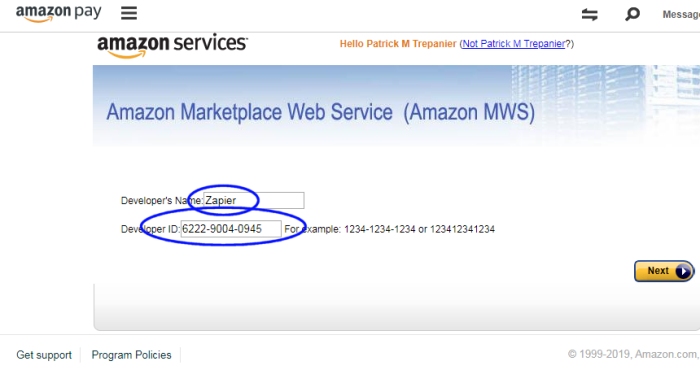
Set Developer Name and ID:
- Zapier is the Developer's Name.
- 6222-9004-0945 is the Zapier Developer ID.
- Copy and paste these values into the screen and click 'Next'
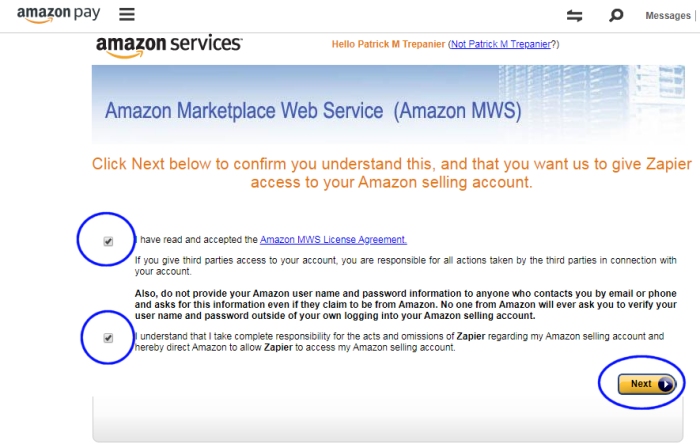
Agree:
- Check the boxes, read the agreements, and if you accept them, click 'Next'.
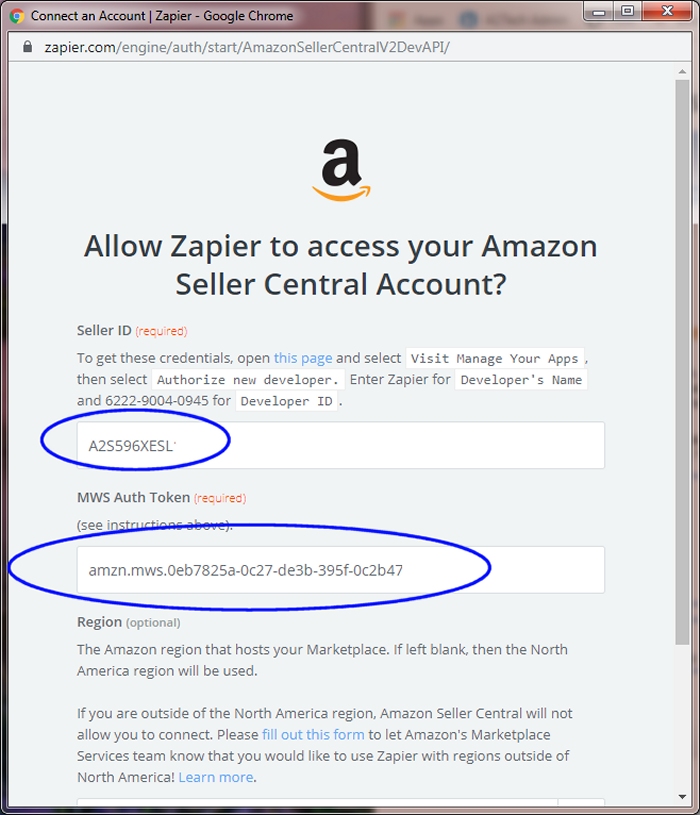
Copy your Seller ID and Auth Token:
- From within your Amazon account screen, copy the Developer ID and Auth Token back into the Zapier screen you started with.
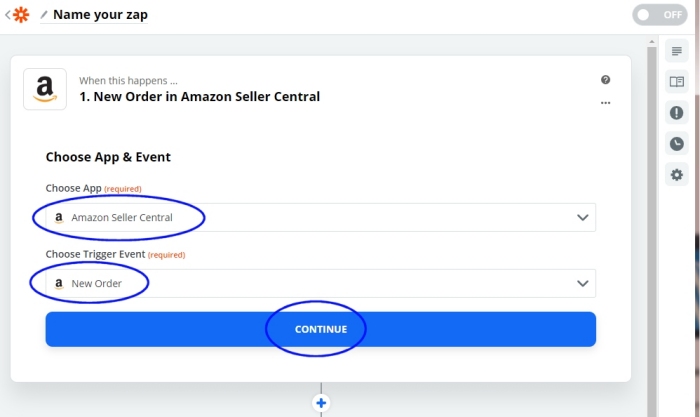
Choose New Order:
- Once you're successfully connected to your Amazon seller account, choose the 'New Order' event in this 'App & Event' step.
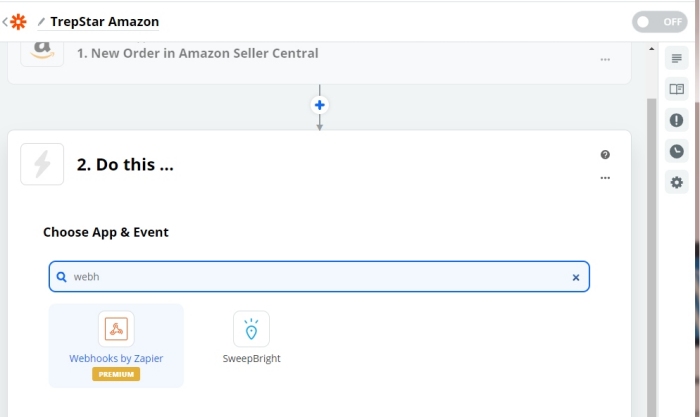
Choose Webhooks By Zapier:
- For the 'Do this...' step start to type webhooks
- You will see Webhooks by Zapier in the list. Select it.

Choose POST:
- Choose POST for the Action Event
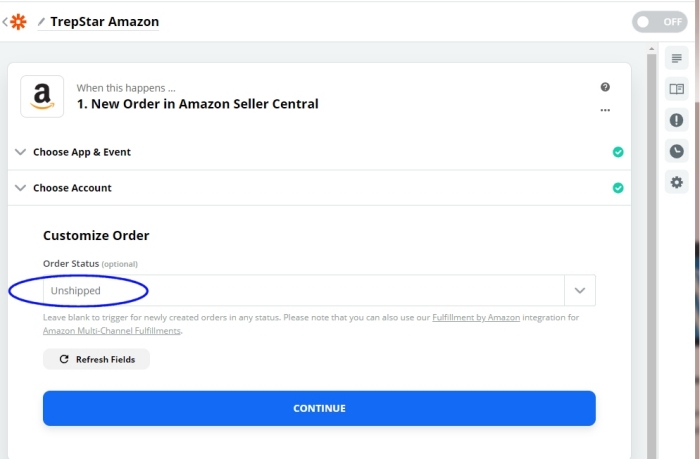
Customize Order:
- Choose the 'Unshipped' status. Each new Amazon order has a status. We want to trigger the integration based only on unshipped orders.
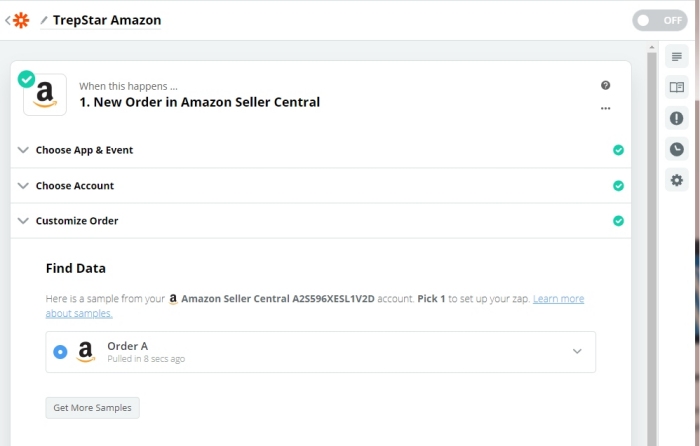
Find Data:
- In this step, Zapier will gather some order data from your existing Amazon orders.
- Choose one of your recent orders for this test.
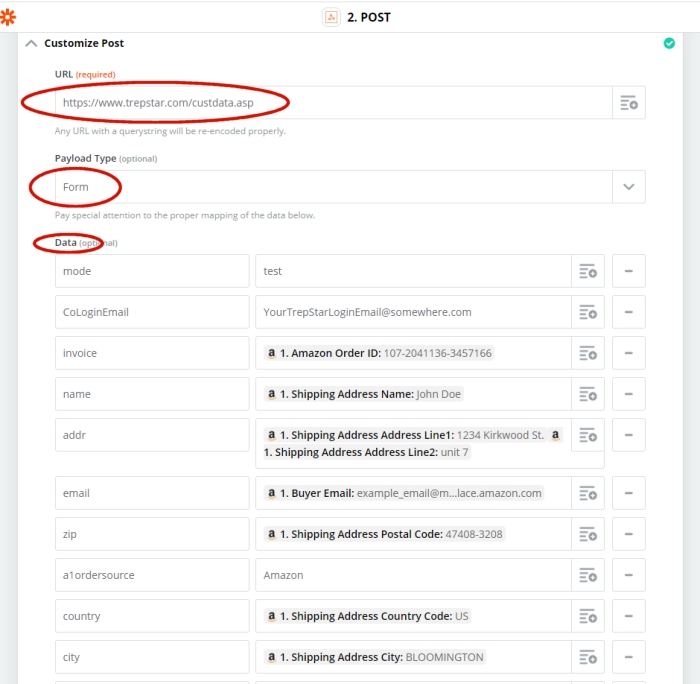
Customize Post:
URL and DATA:
- URL needs to be set to:
- Payload must be set to Form.
- Data
- The idea is to type in the TrepStar field name on the left, and find the associated data element from your example order data.
- You will type in specific field names on the left hand column.
- These field names must be spelled correctly. Copy and paste them from below.
- It does not matter if they are upper or lower case.
- The order of the field names does not matter.
Fields:
The following list are the fields required by TrepStar that you need to configure by choosing the appropriate Amazon order data fields:
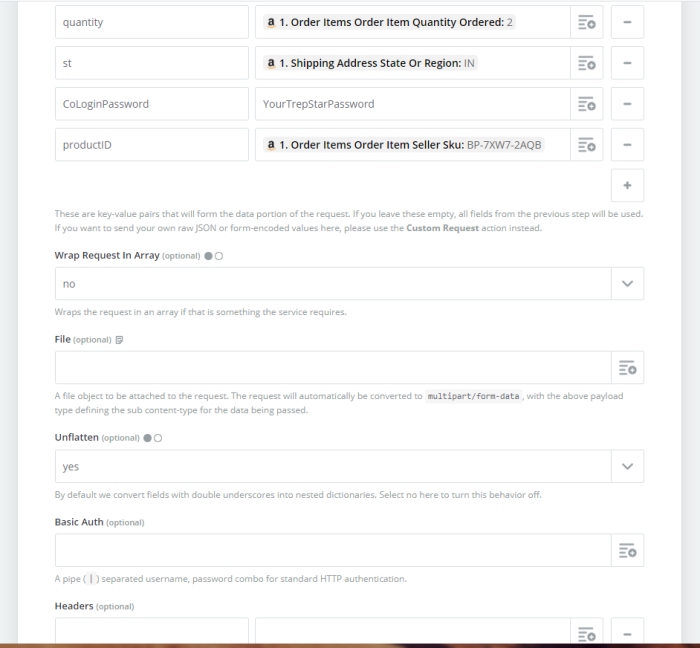
| productid | Set to Order Items Order Item Seller Sku: |
| quantity | Set to Order Items Order Item Quantity Ordered: |
| invoice | Set to Amazon Order ID: |
| name | Set to Shipping Address Name: |
| addr | Choose Shipping Address Line1: Then type in a space before also selecting
Shipping Address Line2. You want to have a space between the fields.
It's important to have both Address lines combined here (with a space in the middle) or incomplete addresses will be sent to TrepStar (and returned by the post office at your expense). |
| city | Shipping Address City |
| st | Shipping Address State or Region |
| zip | Shipping Address postal code |
| country | Shipping Address Country Code |
| Buyer Email | |
| CoLoginEmail | Your TrepStar Login Email. |
| CoLoginPassword | Your TrepStar password |
| mode | test or prod. Set to test at first, and change to prod when you see test orders correctly submitted to TrepStar |
| a1ordersource | Amazon |
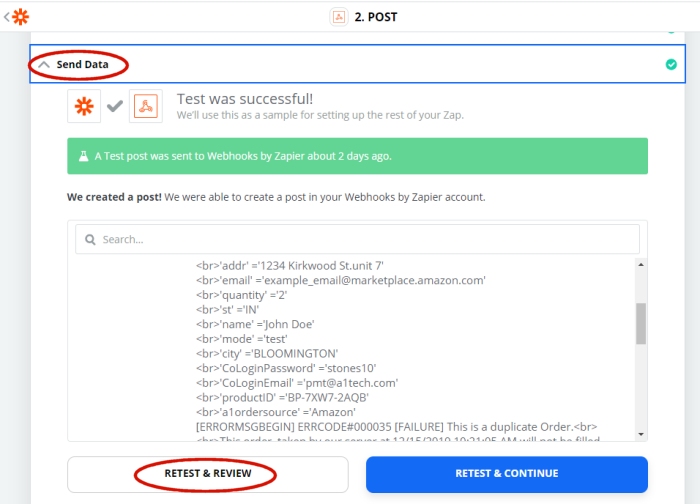
Testing:
- When finished setting up the POST variables above, login to TrepStar and configure your products (see the next step below).
- When you've set the TrepStar eCommerce ID String for each of your Amazon Seller SKUs, you can then 'Test & Review'.
- Look for the responses from the TrepStar server.
- Check your TrepStar account 'Recent Orders' list.
- You must associate your TrepStar products with your Amazon Seller SKUs before this will work (see the next step below).
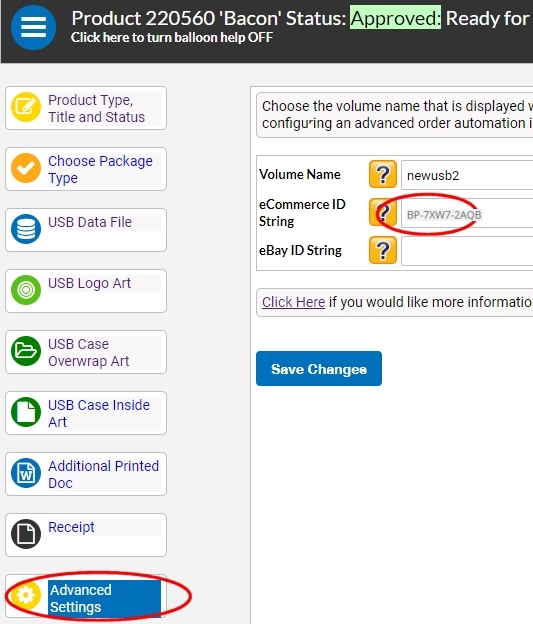
Correlating your Amazon Seller SKUs with your TrepStar Products:
- In an earlier step (above), you assigned the TrepStar productid field to your Amazon SKU
- In the example above, the order was for Amazon SKU BP-7XW7-2AQB
- For example, if the product BP-7XW7-2AQB corresponded to a TrepStar product, you would need to:
- Login to TrepStar
- Configure that corresponding TrepStar product.
- Go to the 'Advanced Settings' section of the TrepStar project.
- Copy/Paste your shopping cart product ID into the TrepStar eCommerce ID String and Save the changes.
- By doing this, you've associated the Amazon product SKU with the TrepStar ID.
- This is the only way TrepStar knows which project was ordered.